
Isuzu Trek Members Infoletter #42
May 2019
Welcome to Isuzu Trek Infoletter #42.
The I-Trek infoletter mailing list is now managed in a Google Group: (https://groups.google.com/forum/#!forum/i-trekinfoletter). If you would like to be included in this exclusively Isuzu Trek group please request inclusion or e-mail the editor Bret Medbury for info at isuzutrek (at) gmail.com or islandduo (at) comcast.net.
Index:
Custom Mods for Traveling Single: Glenn Shindler
Greasing the Front wheel Bearings: Glenn Shindler
Lets Talk Cooling Denney Jones
Repair of Dump Plumbing & New Inverter/Charger Larry Bacon
Mysterious Roof Holes (proud/raised Staples) Bruce Matlack
Transmission Overhaul Bruce Matlack
Trivial Coach Additions I just Love Bruce Matlack
Improving your Trek’s Ride Clark Van Galder
Front Lighting Overhaul Clark Van Galder
Your Transmission Can Talk to You John Fell
Isuzu Trek production numbers Gary Smith
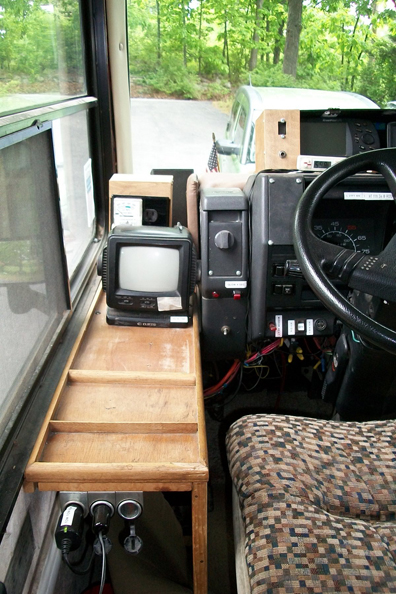
Custom Mods for Traveling Single Thanks to Glenn Shindler gshindler64(at)earthlink.net
I am sending some photos of my cockpit switch rearrangements. I haven’t been able to insert any arrows or circles to indicate what’s what so I considered sending you a photo with color-coded squiggle blotches over the various items plus an unretouched photo so you could add the professional touch. On the other hand, why bother? One must place switches where space permits and everybody’s different in that regard. Since I have no dash air there was no need for all the little individual air discharges and these are now mostly replaced with sheet metal panels – switch panels. Most guys wouldn’t even consider doing this and I wouldn’t either if I had dash air.
PS: The little B&W TV/radio is the rear camera monitor and the ugly piece of masking tape is to prevent accidentally turning the volume pot. Some back-up cameras have provision for two-way conversation with the backer-upper watcher person. Neat feature.
PPS: The roof A/C control is to the left of the strg wheel, right above the “Glow 4 Seconds” button. (The automatic glow relay didn’t seem to be working, but real switches work just dandy.) A shallow U-shaped notch is cut in the A/C shroud where the control wiring enters the ceiling wiremould. All terminations use spade terminals so no cutting/splicing of wires is needed.
PPPS: The visible VM is on genset ckt B, is of poor quality and continually oscillates all over the place. On the other hand, since it’s not tied to the ATS it instantly shows when the genset has started (or stopped – can’t hear it when driving.) The better quality Micronta VM is hidden by the TV monitor. Due to the size and configuration of the two VM’s, they do not fit any other way in a standard quad receptacle. Someday I’ll rebuild the 120 VAC receptacle box to separate the two receptacles or maybe get a couple of digital VM’s instead. I had to replace the DC VM and really love the new blue digital display.


Greasing the front wheel bearings Thanks To Glenn Shindler gshindler64(at)earthlink.net
This is a very infrequent maintenance task but it’s dirt simple: take everything apart, arrange the parts in a clean container in the order of removal, re-grease the bearings, put everything back. What could be easier?
So, I had skimmed the reinstallation procedure, especially the bearing preload part, but didn’t notice the “spacer” (aka “distance piece”) on the schematic. This is the very first part back on the spindle and I’ll bet many guys don’t even know about it since it tends to stick, greased in, at the base of the axle spindle and thus is not removed. That’s where my first side stuck, and I didn’t even notice it. At the second wheel, however, it came off with the hub and I didn’t even think to note which way it was oriented. Turns out the svc manual didn’t have any written instructions and none of several schematics showed the configuration of this part. The spacer looks every bit like a regular bearing race except the concave side is not precisely milled as it would be for a bearing race.
So, there are two ways to reinstall it and I, incorrectly, chose to orient the concave side out, toward the inner spindle bearing. When the hub would not go completely onto the spindle after multiple tries I pulled off the hub and tried just the spacer alone. The spacer ID has a very close tolerance over the spindle and it was then obvious that the milled radius at the base of the spindle wouldn’t allow the spacer to seat fully. So, turn it around with the concave side IN, and the rest is a piece of cake.
Oh yes, one of the cautionary instructions is be careful that the outer bearing doesn’t fall off into the dirt. I pulled that stunt 3 – 4 times because the hub couldn’t be pushed in sufficiently to retain the outer bearing.
Couple other notes: All my life I used the stiff viscosity yellow, long fiber. wheel bearing grease but the last time on the Trek I used Sta-Lube Moly-Graphite grease (approved for this application) and applied it with the grease gun via a thin needle applicator. (Thus, the inner bearing and grease seal didn’t have to be removed for the job. You initially clean off enough of the existing grease to see where to insert the needle between the roller bearings.) I was very much impressed with the quantity and cleanliness of the previous Sta-Lube grease remaining in the rollers, especially since I was now about 20 kmi past the normal 32.5 kmi maintenance interval.
I’m also not sure if I previously performed the bearing preload procedure since most vehicles instead call for a certain torque on the spindle bearing while turning the hub. Isuzu calls for a scale to be applied to one of the wheel lug nut studs after first tightening down the spindle nut to seat the bearings. Then you loosen the nut and gradually tighten it until the scale shows 3.9 lbs for a new bearing or 2.6 lbs if you reuse the old one. I used a fish scale – not the most precise instrument but at least the results are repeatable. Pulling on the wheel stud requires more force to get it turning so I interpreted the proper preload force to be what it takes to keep it turning.
Lets Talk Cooling Thanks to Denney Jones denneyjones(at)gmail.com
This repair was completely unexpected to say the least. How often do you add coolant to your radiator? If you are like me it was very seldom. Our Trek only has 30K miles on the engine. However it is used very frequently within the state of Florida. This year we took a trip to Mobile, AL in November. All was fine for the drive to Mobile. On our return trip the Trek was running a little warm. At a stop I checked and noticed a water leak appearing to be a bad hose clamp. Filled the radiator, replaced the clamp only to go 5 miles and same scenario again. Being a Sunday repairs were out of the question. A diesel mechanic said it appeared to be a radiator leak. He was at the rest stop and offered to help. My only option at the time was to add some stop leak to the radiator.
This was done and the leak stopped. We traveled home. Knowing there was a leak I wanted this repaired professionally. I decided to remove the radiator myself to eliminate a huge labor bill. So my experience!!
Removal: First there is a brace at the top of the radiator held with a little clip. Next came the upper bracket with rubber shield held by 4 bolts. Then the lower bracket with 4 bolts. After removing these brackets I drained the radiator and unhooked the 2 transmission lines. Now came the lower radiator hose and the upper hose. Fair warning every hose clamp had to be broken to remove. Some in tight spaces. Room is limited so I loosened the left and right radiator mounting bolts. This will give you just enough room to wiggle the whole setup. I decided that removing the intercooler from the radiator would be best. It is held to the radiator by 4 bolts. After removing the bolts you must remove the 2 orange hoses. Now with a little effort the intercooler was removed.
Lifting the radiator off of its mounting bolts it became apparent that the fan shroud had to be removed. There are 4 bolts one at each corner. It also has a foam seal between the shroud and the radiator. I pushed the shroud towards the engine and it will rest on the water pump. Now you will have room to remove the radiator. Mine was removed without raising the Trek. Remember it is pretty good sized and a little heavy. Raising your Trek just a tad would be advisable.
After removal I could not believe what I found. HALF OF THE RADIATOR WAS GREEN.
The blueish green from a long term leak. It had been leaking for some time. I really had never noticed any leakage in my driveway. When installed and all put back together you cannot view the back of the radiator. I took the radiator to a professional radiator shop for repair. They called and said the whole radiator needed to be recored and they advised replacing the plastic drain valve with a brass one. They confirmed the leak was quite old. My bill when finished was 650.00 with a 1 year warranty. OUCH!!.
Now after getting the radiator and preparing for replacement you need to think long term repair. It is highly advised to replace all water hoses at this time. There are 2 for the turbo. I used 5/16 hose for this. The bypass hose on top of the water pump and the 2 radiator hoses. Here is the part numbers and pricing for the factory hoses.
Bypass hose part #8-94132-490-0. Cost 10.71.
Upper hose part #8-94455-065-1. Cost 30.39.
Lower hose part #8-97032-227-1. Cost38.35.
The lower hose comes complete as an assembly with the metal sleeve. All of these parts were available. I replaced all the hose clamps with worm clamps.
Replacement was much easier. Raised the radiator in place to its mounting bolts. Do not tighten so you have movement needed. Installed intercooler, upper and lower shield, radiator mounting bolts, intercooler hoses, transmission lines, now the fan shroud, and finally the radiator hoses. Last item was the brace and pin at the top. Replaced all coolant and topped off needed transmission fluid. This repair took me 2 weeks because the shop had the radiator for 9 days. It was a learning lesson for me to say the least. However I am hoping this is good information for all the Isuzu owners. The cooling system is very important.
THIS UNKNOWN COULD HAVE COST ME AN ENGINE!!!
Keep on Trekkin. Smiling and Safe.
Tachometer Install Thanks To Denney Jones denneyjones(at)gmail.com
This article would not be possible had it not been for Bret and Dickk. Their support and guidance has been second to none.
Ever since acquiring our Trek about 10 years ago I have admired those who have installed gauges in their Treks. Coming from the factory basically with very little other than a temperature, fuel, and speedometer. I know their are still many of you Isuzu owners with this same setup. With great ambition I decided enough is enough.
So this will be an article involving adding a tachometer to your coach. Hopefully you understand that exhaust gas temperatures, boost pressure, and transmission temperatures are very important if you own a diesel. Actually a real safeguard.
I began my project by determining where I wanted the gauges to be installed. Some have put a gauge pod on top of the dash. The biggest influence was Bret’s professional looking box in the front corner. However Bret tells me it interferes with the side curtain completely closing. I decided to create something narrower and tilted back some for easy viewing. My design was made from the leftover piece of birch paneling I bought for refrigerator panels. It is wood glued together with wood corner moulding inside and very strong. I covered this with thin foam like was used on the dash. Finally it was covered with cheap Naugahyde matching the dash color.
So the box is made, location selected. Now I must determine how many gauges I want to install. My selection was 4. My gauges are 2 1/16 and the tach is 2 5/8. Outlines were made on the box and I cut the holes with a hole saw. Turned out great.
The box sits where the original backup camera was. It is pulled forward to within 1 inch of the dash edge.
Now I am ready to install the tachometer chosen. Many have installed the TINY TACH and that is a good simple choice. I am old school having raced a 57 Chevy for numerous years. I wanted a manual tach with a moving arm. Your choices are not to plentiful because their is no distributor or coil on a diesel motor. My choice was to purchase a AUTOMETER 2888 tachometer. The price of the kit was 160.00. It comes with everything needed for the installation. There is a sender that straps to the center of your alternator and connects to the gauge. Plus and minus wire for the lighting. The wiring for the Trek is very funky so I ran the positive wire to the fuse panel and tied in to the running light circuit. The lights are on whenever the key is on. No big deal. When started the tach worked but needed to be calibrated a little. AUTOMETER advised buying a handheld tachometer.
I went to ebay and got a cheap 10.00 model DT-2234C. It comes with a case, battery, and a supply of reflective tape.
The process is easy. Place a piece of reflective tape on the crank pully. Start the Trek and let it warm up. Now aim the handheld unit at the tape do it a couple times to get a solid readout. Now you can calibrate your tach with a small screwdriver on the back of the tach. Worked very well. So now I have a tach and I feel like a kid again.
Remember the most important thing is determining how many gauges and a location.
The choices for gauges are many. Used or new be sure you get everything needed for the install. Tachometers for your Trek are very limited and this was just my choice.
Next time we will discuss installing the transmission temperature gauge.


Editor’s note: Denney got me thinking so I have built a narrower gauge box similar to his so as not to interfere with the curtain, Thanks Denney.

Repair of Dump Plumbing and New Inverter/Charger Thanks to Larry Bacon larrybacon1(at)gmail.com
Hello
Preparing for trip to Barego Springs from Sequim WA and noticed I have broken some of the ABS pipe at the waste removal area on RV. Must have occurred while backing up to store the RV in the fall.
I have a 92 24’Trek with about 80,000 miles on it and I pamper it.
Replacing the piping and valves is not easy because it is all original and nuts and bolts just break off from rust.Get the valve assemblies from Amazon today and proceed from there. I do most of the work because I enjoy it with the addition benefit of saving lots of money. I have added an AIMS inverter and 2 more batteries to go along with 4 solar panels for a total of 6 batteries.I plan on doing more primitive camping because it is getting too crowded in the full hookup sites.
Went to Grand Canyon, Monument Valley and various other National Parks after school started last year and everywhere was packed with RVs in OCT. My 24’ will go a lot of places to camp than the bigger units can. I like being spontaneous and cannot get into making reservations and then keeping a schedule to satisfy the reservation.
Typing this while taking a break from under the Trek so maybe a little grumpy. This is a picture where the new inverter replaces the old converter.
Happy trails
Larry Bacon
Editor’s note:: Grumpy Larry? Never!

Mysterious Roof Holes (Proud Staples) Thanks to Bruce Matlack matlackwindsurfing@gmail.com
For years I have had mysterious holes appear in my roof. The previous owner had told me to yearly paint the roof with elastomeric. I think I found out why! Another small leak appeared recently. Upon close inspection, I found the top of a one inch, long staple popping through the roof. Apparently they work loose over time and perforate the covering! I am thinking: “This is not the first unexplained, dumbass hole up here over the years”
The light has come on. Inspect and paint the roof often.
Editor’s note: The staple issue is a common one. Best repaired by removing the offending staple then patch the hole with a piece of Eternabond Tape (same stuff used on all seams). Is roof is still original, meaning no previous owner put elastomeric or other snake oil on it paint with Brightside Marine paint.
Tranmission Overhaul Thanks to Bruce Matlack matlackwindsurfing@gmail.com
I had a successful complete transmission rebuild, right on budget with their estimate of $4600 which included two transmission coolers and all updates. They specialize in Isuzu Trucks: I recommend them: They under promise; over produce. Lee county transmission, Fowler st., Ft Myers, Florida. Transmissions and exhaust systems only.
Trivial coach additions that I love: Thanks to Bruce Matlack matlackwindsurfing@gmail.com
A battery operated, motion detector, toilet, night light. Made for house toilet rim mounting but works mounted anywhere. Great to take a toke then pee to a light show
The next addition is a bug zapping , half size, tennis racket that electrocutes anything it contacts while a spring loaded, on button is held depressed. About $16. Every nerd has to have one at his/her bedside. Oh yeah, you have to swing it at the buggers. I bought a second one recently.
Another is one of those collapsible, telescoping ladders that fits in my wardrobe closet or basement. What a joy that is!
I replaced my fridge to the tune of $1300 plus $250 fright from Missouri. Beautiful Norcold unit but the first one had water logged styrofoam, and my alert installer refused to install it. The Tape was peeling off the insulation, and finger impressions made depressions in the foam, indicating water saturation. My recommended Mobile RV Guy here: Gordon at Quality Matters in Ft Myers. I use him for everything.
Heading up to Maine and Canada for the summer and hopefully taking in the a 50th anniversary gig of Woodstock in NY!
Improving your Trek’s Ride Thanks to Clark Van Galder clarkrvg(at)gmail.com
We have been continuously trying to improve the ride which might be a losing battle…
We arched the front springs and replaces the bushing, which helped. Then replaced yhe tires from 215 to 235 which allowed lower air pressure which helped the ride alot. We replaced our front seats which also helped. So the front end is tolerable now the rear axle.
There were airbags add on the rear springs which leveled the coach and reduced sway. We had a tire blow on the rear which damaged the airline to the bag. It was recommended to replace the airbags with Tembrens. The Tembrens are rubber airless bags which are used on commercial trucks. The ride in the back is intolerable so we are going back to airbags. Will have to do some measuring to match the springs and airbags.
Hopefully someone has done this and knows what airbags will fit?? How wide the springs are and the distance between the springs and the axle are the main measurement. When the snow is gone I will get started.
Front Lighting Overhaul Thanks to Clark Van Galder clarkrvg(at)gmail.com
We also replaced the directional and parking lights on the front.
The wiring in places was rotten so be prepared. The headlight sockets were replaced and are a standard easy to find unit.
I repainted the front which really improved the appearance.
The bumper is now tan and it seems to soften the appearance from the dark green.
Clark, 94 2840 trek, Twin beds
Your Transmission Can Talk To You: Thanks to John Fell johnnfell(at)gmail.com
NOTE: PDFs of these next 3 pages follow the pictures. This makes it easier for you to see them close up and print them if you want
![]()
![]()
![]()
Replacement for Your Door Holder Thanks to Henry Fusco acudoc888(at)gmail.com
Four magnets to hold door open. Very strong, two also works. These grab Henry’s dead bolt door lock.

Improve the furnace performance Thanks To Henry Fusco
Replaced wood slats with wire grate I had. Great circulation for knockout, going to paint the gray metal with high temp black

Editor’s Note; The furnace grate is also the cold air intake so insure that the heated air exiting has positive direction out and away so the furnace will not re-ingest it’s already heated air. The floor ductwork is of inadequate size so an arrangement like this can be very beneficial.
Isuzu Production Numbers 1991-1994 Thanks to Gary Smith trekker01(at)gmail.com
I can’t substantiate the numbers contained in the attached file, however they came to me just recently from Brian Wigzell (author of the Safari history articles published over the years in the Safari Trails). When SMC was sold to Monaco he got some production information from a contact at SMC that went from conception to sometime in mid-1990s. I tried to get the numbers for all Treks, but it was not complete enough to do so. I believe these to be reasonably accurate for the Isuzu years.
++++++++++++++++++++++++++
Number of Treks built 1991 to 1994, by year, length etc. These figures come off of a spread sheet that was given to me at the demise of SMC, it is far from complete but I believe that it to be accurate up to the 1994 model year coaches. It appears to be driven by an SMC serial number, year, floor plan, chassis, VIN, model name, special items required, colour, dealer, delivery address, invoice date. I hope this helps.
| 1991 | 24′ | 6 |
| 26′ | 17 | |
| 28′ | 93 | |
| 1992 | 24′ | 51 |
| 26′ | 17 | |
| 28′ | 28 | |
| 1993 | 24′ | 61 |
| 26′ | 6 | |
| 28′ | 39 | |
| 30′ | 1 | |
| 1994 | 24′ | 166 |
| 26′ | 13 | |
| 28′ | 55 |
What a treat to have these numbers. So – who has the 1993 30′ Isuzu??
A huge thank you to all the Isuzu Infoletter contributors. If it was not for you folks there would be no infoletter and all Isuzu owners would be the loosers.
Just FYI, I am still providing LEDs to inexpensively convert your Trek to LED interior lighting. I say that with some urgency as I may have to “retire” from this as dependable sources for the material is getting to be a real issue.
I also have paper copies of the original Owner’s manual to which I have added a factory price sheet (see what your Trek cost new, you will be surprised) plus a disc containing complete parts list for your Chassis and another disc including the complete shop manual for your chassis. The parts list provided to us by Denney Jones is especially useful because it makes finding parts a whole lot easier once you have a part number and this list includes everything right down to the tiniest screw.
Anyone interested in any of the above treasures please contact me directly at islandduo(at) comcast.net
Recalls: Honda recalls a bunch of their most popular generators, so if any of you have one of these:
https://www.consumerreports.org/recalls/honda-recalls-inverter-generators/
And this is still in effect:
Kidde has recalled almost all their smaller plastic handled fire extinguishers made from the 70’s to present, check here to see if you have any of these: https://www.kidde.com/home-safety/en/us/support/product-alerts/recall-kidde-fire-extinguisher/
Personally, I have replaced ten.